Project groups in ERPLY Books
Project groups in ERPLY Books helps to manage and get an overview of projects. Similar projects can be grouped, so it is easier to find these later. In addition, it is possible to connect invoices with project groups to get an overview of expenses.
How to start?
In configuration enable multiple projects selection. In order to do that, go to “Settings” > “Configuration” and make a tick in front of “Enable Multiple Projects Selection”.
How to add different project groups?
Go to “Settings” > “Initial data” > “Project Groups”. You can add new rows when clicking on “+” button. When needed project groups are added (e.g employees, conferences etc), click on the save button, then refresh the page for the changes to take effect.

How to add different projects under project groups?
When going to “Settings” > “Initial data” > “Project Groups” a new page will open, where users can add new projects under project groups. First, go on the “Name” cell and click on the arrow, choose “Columns” > “Project groups”. As you can see, a new row appears and the last cell of that row is “Project groups”. There you can assign projects into project groups. For example, write your employee’s name (e.g John Smith) and in the project group cell choose the needed project group (e.g employees).
You can add new rows by clicking on “+” button. If all the needed data is added, click on “Save”.
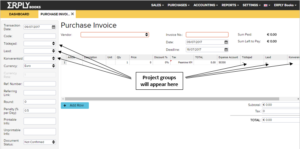
If you want to compile a purchase invoice, then it is possible to determine project groups there as well. Go to “Purchase” > “Purchase invoice (add new)” > “Purchase Invoice”. As you can see on the picture, on the left menu and on the transaction project groups will appear. There users can determine, with which project group an invoice will be connected.

Project groups can also be chosen in different reports like in balance sheet, Income sheet, general ledger, journal report, manual journal, in customer and supplier reports etc. Click on the arrow in “Project” cell to make choice.
Solution for seeing income statements by project groups
Opening the balance or income statement lets you see data by the totals but if you want to see them by different project groups (for example by location) you can add them with a plug-in.
You can add different project groups if you open Settings -> Initial data -> Project groups.You also have to enable the multiple projects selection because project groups only work with this setting. You can do this by going to Settings -> Configuration.

You also have to check the “Detailed” box on the balance or income sheet and click Search.

Now you can see the balance or income sheet data by different projects. This plug-in goes with the global parameter GLOBAL_USE_PROJECT_GROUP-REPORTING.
More information about project groups you can find in the following video:


