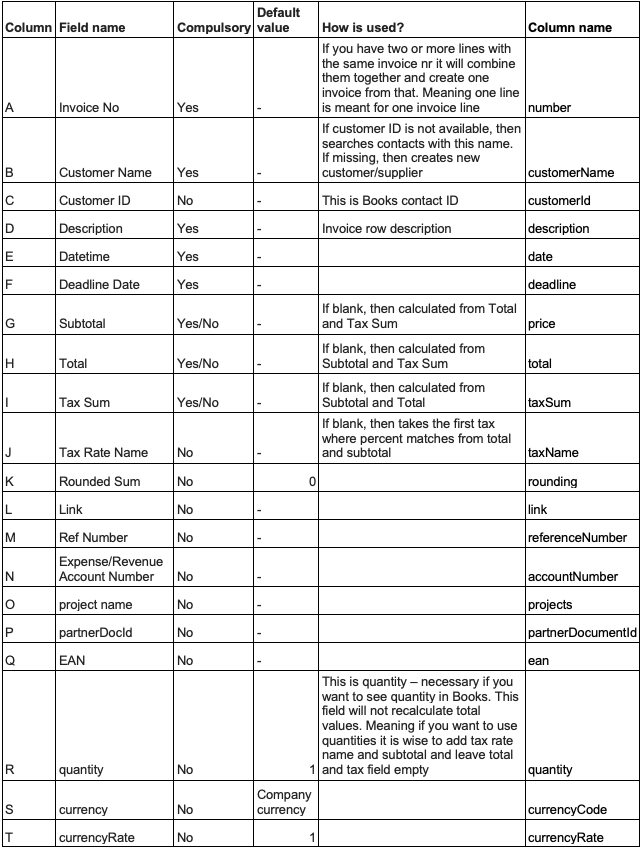
Default importing options are described in the video: https://www.erplybooks.com/manuals/importing-invoices-into-erply-books/
This tutorial speaks about how to import invoices with custom fields and XLS files.
Default CSV file alignment

Additional options with invoice import
You have the following options:
- If you don’t want to separate projects with project names and instead want to use projects separated by project groups then you can add project group columns
- If you want to use project groups then add them into separate columns after currencyRate – leave one empty column after currency rate and then every project group into separate column
- Into the header of the project, the group column adds project group id. Id values you can get from the report generator
- You can change the format of the columns
- If you want to use your own alignment not the default one then add global GLOBAL_USE_INVOICE_IMPORT_ORDERING
- With that global in invoice import, you have an ordering field where you can add your own ordering alignment. It should have previously described column names separated by “|”, “,” or “;”.
- You can add custom fields.
- If column alignment is not overridden then additional fields start from column U (the same as project groups).
- For example, if you want to add customer registration code into column U then make sure U1=registrationCode.
- All the additional customer columns are described here:
- bankAccountNumber
- bankIban
- bankIdentifier
- bankName
- bankSwift
- code
- contactPersonEmail
- contactPersonName
- contactPersonPhone
- entityTypeCode
- fax
- info
- invoiceSendingAddress
- invoiceSendingIdentifier
- legalAddress
- legalCity
- legalCountryCode
- legalPostcode
- phone1
- phone2
- referenceNumber
- registrationCode
- supplierReferenceNumber
- vatNumber
- Website
- All other additional columns:
- paymentDate
- paymentSum
- paymentAccountNumber
- paymentAccountId
- paymentArchivingId
- parentDocumentNumber – requires GLOBAL_INVOICE_IMPORT_PARENT_TYPE

